OSD600 – Final Release

For the final release, I decided to stick with Firefox Screenshots. I was still having issues with debugging the extension, so this time I took a different approach. I looked through the solved/closed issues to see if there was any mention of debugging or something that could possibly help me. I stumbled upon a closed issue that used Firefox Nightly to recreate the issue. Maybe if I tried recreating bugs with solved issues, it will help me  with my debugging issue. I felt like I was getting closer to being able to debug the extension, but again, no luck. With all of  these problems and no help from their documentation, I decided that I should document how to install the extension for Linux.

I remember when I first started on this project, it took me about 4 hours to install PostgreSQL and to get the server up and running. Now that I am familiar with PostgreSQL, it took me about 10 mins to uninstall, purge and reinstall it. The installation isn’t too difficult if you know what you are doing. I uninstalled and completely purged PostgreSQL from my laptop. I had to make sure that there was no trace of it left anywhere on my system. I had to kill the open ports, stop the services and then uninstall the program and all of its dependent packages. I reinstalled the database and ran the program. It worked! Now, I had to uninstall and purge again and start documenting.  I think I did this about 5 times before being confident enough to submit a pull request. This was their response:

Screenshot_2018-04-23 Download , Share and Delete buttons do not loose their highlight after each respective action is can[...]

What was frustrating about all of this is that their README only says “Install PostgreSQL”. There are a bunch of additional steps you need to do before getting the server up and running and to get the extension to run on localhost. If there were instructions initially, this would have saved me a lot of time (and tears). I had hoped that with my contribution, I could have help somebody with the installation and with no troubles. I understand where they are coming from, but they should have at least linked PostgresSQL’s instructions some where on their page.

For my second bug fix, I found a CSS issue that causes buttons to remain active, even after being clicked. 30171034-69584802-93f9-11e7-87a1-93d401518abe.gif

I found this bug quite simple to solve. Now that I am familiar with the code, I located the CSS file that contained the styling for the button. The issue was that the styling for hover and focus were the same. I separated the two attributes and removed the background-color for focus. I kept the border however, so that you can still distinguish if the button is in focus or not. I submitted the pull request with no issues this time and hopefully they accept my code change.

During the last 4 months, I gained first hand experience in the open source world. I was hesitant in the beginning, thinking that this would be to difficult for me. At some point, this was true, but I still tried my best with these assignments. For this last release, I felt like I learned how challenging yet rewarding open source projects can be. This was definitely a learning experience that I can carry forward throughout my career.
 

SPO600 Project – Stage 3

In this final post, I would like to discuss my findings throughout this project, where I could have improved and what I learned.

Going into this course, I was worried about how well I would do in it. The concept is hard to grasp and understanding how optimization works at the assembly level proved to be challenging. No matter, the topic was interesting and I wanted to learn how to optimize code. With this project, I definitely learned how code can be optimized and what efficient code looks like. I struggled with the project I chose but it showed me that efficient and fast code is possible.

As I mentioned in my last 2 posts, I have tried to optimize the compiler flags and find hotspots within the code. Unfortunately,  I couldn’t find a way to further optimize it. I also discussed that compared to other compression and decompression software, Density proved to be quite fast.

I learned quite a bit about optimization flags and how much it can change the performance of your code. I was impressed with how different -O3 and -Ofast are, even though -Ofast is just -O3 with -ffast-math turned on. I tried over 20 different flags, but none of them seemed to have an impact on the speed of the code. I did however, learn a lot about different flags and how they work. The GNU website was very helpful during this process and provided great detail for each flag.  Initially, I thought I was making some progress with the additional optimization flags, such as -floop-nest-optimize. However as I kept compiling and running the program, I noticed that it made little to no difference.

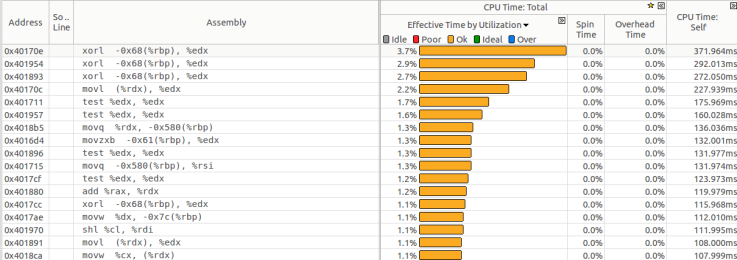
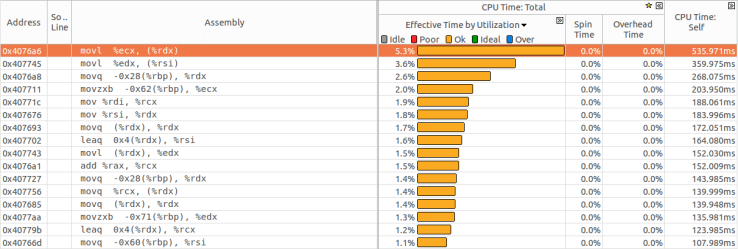
My second attempt involved looking for hotspots within the code. Using Intel Vtune, I was able to locate where the program was taking up the most amount of time. Again, this didn’t help me because the hotspot was the code moving values into registers. I’m assuming this was because of the loop statements within the code. I’ve included the hostspots for both compression and decompression functions, sorted by the longest time.

Screenshot from 2018-04-22 21:52:06
Compression hotspots
Screenshot from 2018-04-22 21:53:47
Decompression hotspots

I wanted to keep looking through the code to find if there was any area I could optimize. I went through Density’s issues on their Github and found one that mentions “improve efficiency for smaller files”. The description states “It takes a certain amount of data for density’s algorithms to be running optimally (ratio wise).
Adding an intermediary processing could be interesting before routing data to the bigger and faster algorithms.” Although I had no clue on how to implement this, I found this quite interesting because although Density is fast and efficient, there was still room for improvement. This is the reason why I find technology so fascinating. No matter how good things may be, it can always get better.

I’ve learned a lot from this course and this project. From different types of architectures, assembly language and how values are stored, this course showed me how it all comes together but more importantly, how to be a better programmer. Without software optimization, computers and software would not improve and would be painfully slow. I had hoped to find a project that I would be able to optimize, but unfortunately, I did not succeed. I did the best I could and will definitely takes this as a learning experience.

SPO600 Project – Stage 2.02

In today’s blog, I wanted to look into the some of the obstacles I have encountered throughout this project.

One of the first obstacles I ran into was understanding the code. The code was written primarily in C with a little bit of C++. C is not my strongest language so some of the conventions and syntaxes were unfamiliar to me. The code uses a bunch of #if, #elseif etc, which I later found out that these were directives. From my understanding of it, they  are used to specify how the compiler should process the input. In this case, if may be used to include or to not include parts of the code based on the architecture. This would allow the program to be compatible with different architectures and to work efficiently regardless of the machine. screenshot-from-2018-04-20-192017.png

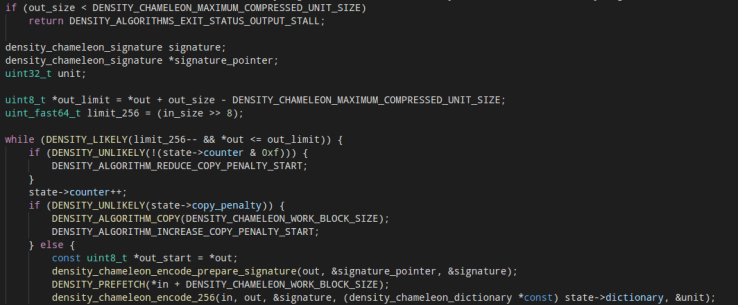
Another obstacle I faced was trying to find where I could optimize this code. As I am sure with the other students in the class, this was the biggest challenge. It was already difficult for me to understand the code, let alone optimize it. Fortunately, the code was organized quite well and I had no troubles sifting through the code. I used Week 5’s Compiler optimization notes in order to  find areas where I could optimize. As I mentioned in the previous blog post, the code didn’t contain many nested loops or large arrays. The block of code below was one of the larger loops I found. screenshot-from-2018-04-20-193752.png

I couldn’t think of a way to optimize this piece of code, and others like it. After battling with the code for so long, I decided to focus my efforts on compiler flag optimizations, as mentioned in the previous blog.

I have never used compiler flags to this degree before. I just assumed everyone used -O3 if they wanted some level of optimization. Learning about Ofast was interesting, to say the least. Focusing solely on performance as opposed to accuracy was something I haven’t really heard of before. Using -gcc -Ofast -Q –help=optimizers helped me understand which flags were enabled. I toggled a bunch of flags on and off which seemed to have no effect on the performance.

During this stage, I have learned quite a bit about how compiling with optimization flags works and how it can impact performance and speed. This whole project was a big challenge for me and I still have a lot to learn about optimization. I hope that I can find a way to improve this code.

SPO600 Project – Stage 2.01

For stage 2, I chose to focus on the Chameleon algorithm in the Density program. The Chameleon algorithm is the fastest of the 3 algorithms Density provides. The source code did not contain many loops or complicated functions. I couldn’t find an area that was further vectorizable, so I focused my efforts on optimizing the compilation of the code. The compiler already uses the -Ofast flag to compile, so I wanted to fine-tune the optimization flags.

I started with the floating-point operation flags. Since we are solely focusing on speed, we can disregard rounding errors and inaccurate calculations. With this is mind, I tried to toggle any flags that corresponds with math calculations. This became quite tricky trying to toggling flags. I started with the flags listed below:

-fno-signed-zeros
-fno-trapping-math
-funsafe-loop-optimizations
-fno-signaling-nans

I was using a dummy file that was 25MB. I compiled and ran the program a few times to see if it those flags made a difference. I didn’t see a significant difference with these flags. I read on forums and websites that these flags should increase the speed of the program. I was confused why it wasn’t working for me. I started looking into what flags Ofast has enabled by default. What I learned is Ofast is just O3 with the ffast-math flag enabled. With ffast-math enabled, the flags listed above are enabled by default. Now, I had to look for other flags the toggle.

-fselective-scheduling
-fselective-scheduling2
-floop-interchange
-floop-nest-optimize

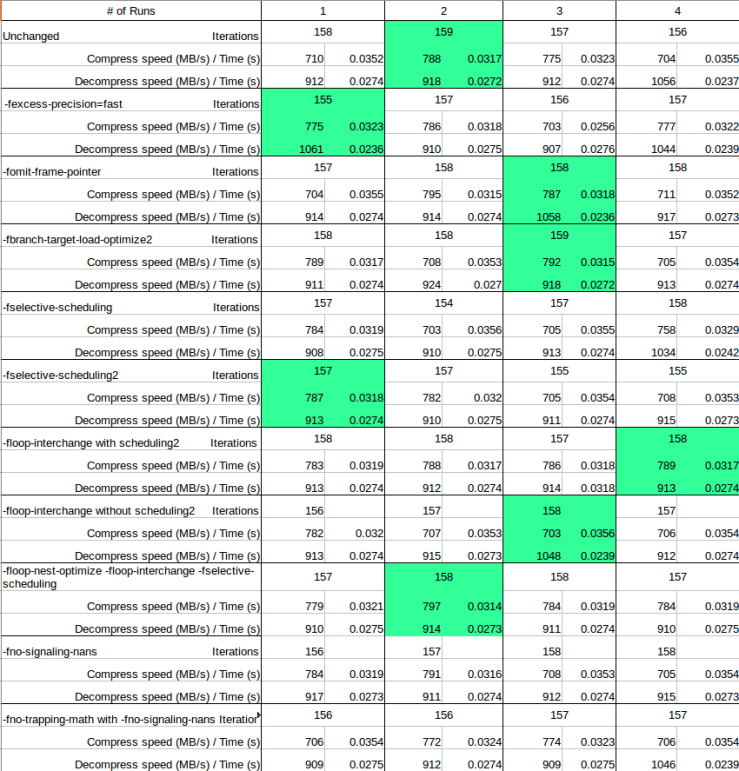
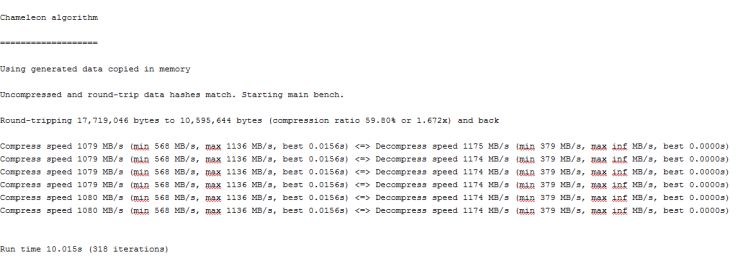
I logged the results and compared them with the initial run. I have highlighted the best runs for each additional flag. As we can see, the results do not vary much from the initial run. There were moments where I consistently had good results, but once I ran the initial settings again, the results remained the same.

Screenshot from 2018-04-19 13:18:41

I believe that the additional optimization flags didn’t work because the logic of the code did not contain complicated loops or calculations. I wasn’t sure what to do at this point, as I have tried as much as I could. I had the idea to profile the program to see if there were any hotspots within the code. I tried profiling the code during stage 1 but I couldn’t run gprof because when I compiled the code, it did not generate a gmon.out file. Their Makefile was a bit too complex for my understand so I didn’t want to alter anything within it. What I did instead was download Intel Vtune Amplifier which is a Graphical profiler from Intel.

I was able to pinpoint where the most amount of time was spent within the code. There were 2 hotspots found, during the functions density_compress_with_context and density_decompress_with_context. Screenshot from 2018-04-19 13:47:10

The compress function takes about 1 second longer than the decompression. I stepped into the function where we can see exactly what is happening within the assembly code. Below shows the hotspot within the compression function. The function takes some time moving and comparing as seen with movl, xorl and test.

decomp1.png
density_compress_with_context

Again, we see that in the decompress function, the moving of values in the registers takes up the most amount of time.

decomp
density_decompress_with_context

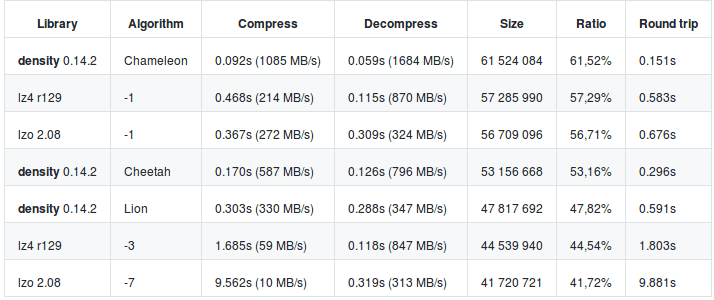
At this point, I am not sure how else I can optimize this code. I found a few comparisons between Density and other compression/decompression software. For the majority of the comparisons, Density algorithms were the fastest.Screenshot from 2018-04-19 15:08:32

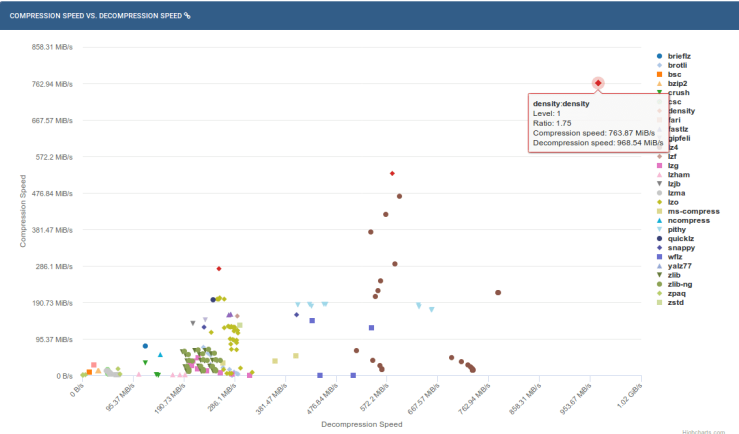
On this site that shows benchmarks of different compression and decompression software, Density still has one of the fastest speeds. Density’s compression ratio however, is on the lower end. This chart that shows the Compression Speed VS Decompression speed, Density is quite superior compared to the other softwares.

screenshot-from-2018-04-19-152040.png

In conclusion, Density’s compression and decompression algorithms is quite efficient as it is. Their code logic and compiler optimization is refined and there isn’t much more I could do. I have attempted to modify compiler flags which yielded no significant changes and I’ve tried to restructure and modify the code, but to no avail. Perhaps in the future, I should take a look at their other algorithms to see if I can some how find a way to optimize that.

Lab 6- Brave Browser Bug

This week’s lab we focused on Brave Browser. For this lab, we were required  to fix a bug in Brave using Test Driven Development. This is the first time I have heard of this term, but I am somewhat familiar with the concept. From my understand of it, we need to create tests that would currently fail, and work backwards from there. From these tests, we can code the fix for the bug.

The first step was to build Brave. I had no issues here. The next steps were to recreate the bug. The bug is about how the browser handles URLs. URLs can sometimes be search terms that are used by the default browser. For example, simply typing “dog” into the URL bar will search for “dog” in the search engine. Brave does this as well. The issue arises when you add a space in between words after the search query. Below are the test cases:

  • "dog" - Works as expected
  • " dog "- Works as expected
  • "dog cat"- Works as expected
  • " dog cat "- Works as expected
  • "https://www.google.ca/search?q=dog"- Works as expected
  • " https://www.google.ca/search?q=dog "- Works as expected
  • "https://www.google.ca/search?q=dog cat" - does not work as expected. Instead places the link inside search box.
  • " https://www.google.ca/search?q=dog cat " - does not work as expected. Instead places the link inside search box.
  • "/home/joe/git/browser-laptop/dog cat.txt" - Does not work as expected. Puts this URL inside search engine.
  • " /home/joe/git/browser-laptop/dog cat.txt " - Does not work as expected. Puts this URL inside search engine.
  • "file:///home/joe/git/browser-laptop/dog cat.txt" - Works as expected, but replaces the space with %20.
  • " file:///home/joe/git/browser-laptop/dog cat.txt " - Work as expected, but replaces the space with %20.

The next step was to create tests. I began with testing URLs with space in between words in the search query.  I created the test cases which failed, as expected. I found the function ‘prependScheme’ which deals with the input URL. I tried fixing this function by adding a replace(/\s/g, “%20”), in each of the if statements. This worked for the case that prepends file:/// before the URL. The issue I was having was that I couldn’t debug Brave through VSCode. I couldn’t tell if my changes were being made to the browser. The only way I could test the code changes was to run the test cases again.

The case I was having difficulties fixing was https://www.google.ca/search?q=dog cat. I couldn’t figure out why the code wasn’t replacing the spaces with %20. I tried creating my own if statement inside prependScheme to replace the spaces. It still wouldn’t work. I decided to look elsewhere; I looked for the code that calls prependScheme. In the function getUrlFromInput, it passes input.trim() to prependScheme. However, it doesn’t replace the spaces with %20. I thought this would be a good place to replace the spaces before passing the URL to prependScheme.w

The change seemed to work, as my tests finally passed. However, I still couldn’t see the changes on Brave.

Firefox Screenshot

dfvbkvoccyn01

After struggling to download, and install Firefox screenshots for well over 2 days, I could not get it to work. Builds would keep failing, the server would not start; nothing is working. The source of my frustration is the fact that their README is useless. They provided no information or details on how to install and set up the project. All it says is “Install Postgres.” Installing Postgres was one of the most frustrating and time consuming things I have probably ever done. They provided no instructions on how to install and setup the server. The next instruction was to “Run the first migration manually”. The link they provided there was also no help. Just a bunch of SQL statements to create tables. I had no idea where to import those tables. After struggling for hours trying to get this server to start, I decided to take a break from it just so that my brain can recover.

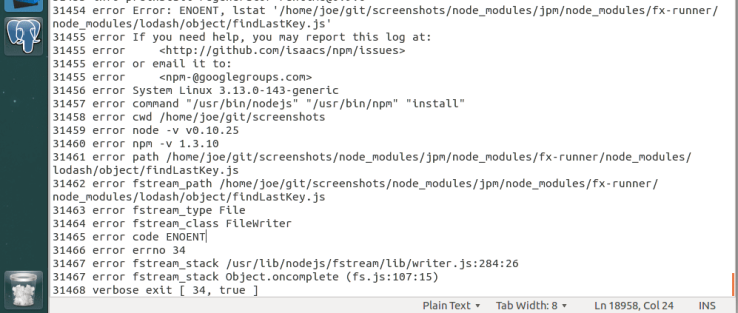
I came back to this issue refreshed and ready to work. I had the brilliant idea to stop trying to get this thing to work on Windows but instead, work in Linux. I reinstalled and setup everything on Ubuntu. I still encountered the same issues but this time, I was able to find an Linux installation tutorial on Youtube for Postgresql. I was finally able to get the server running on port 5432 (default port). Awesome, progress. I tried running Firefox extension now that the server is up and running. I kept getting strange errors regarding babel, nodejs, node-sass etc. I reinstalled each of the dependencies one at a time which solved most of the issues. However, the code still failed to build. This was the error I got: Screenshot from 2018-03-26 14:04:14

I had no idea what this meant. Again, I spent hours installing and reinstalling everything. I didn’t know if this was a server issue or build issue. Nothing worked and I was pretty close to giving up on this entirely. That’s when I noticed something in the error log. On line 31459 above, the node version shows 0.10.25. I was dumbfounded. I was using a dinosaur version of Nodejs. Once I updated Node and npm, the application finally build. I opened up Firefox with the URL localhost:10080, and for the first time in my life, I jumped for joy. The funny thing is, I haven’t even touched the code yet. The next battle begins.

I started by making small changes to the home page of Firefox Screenshots. I made the changes, restarted the server and reloaded the page. I didn’t see anything change. This was really frustrating because I have no idea where to begin. I checked to see if I was working in the right directory. I checked if the server was still running. Everything looked good. It turns out that I have to reload the page and bypass the cache. So far so good, I was able to modify the homepage. Screenshot-2018-3-26 Firefox Screenshots.png

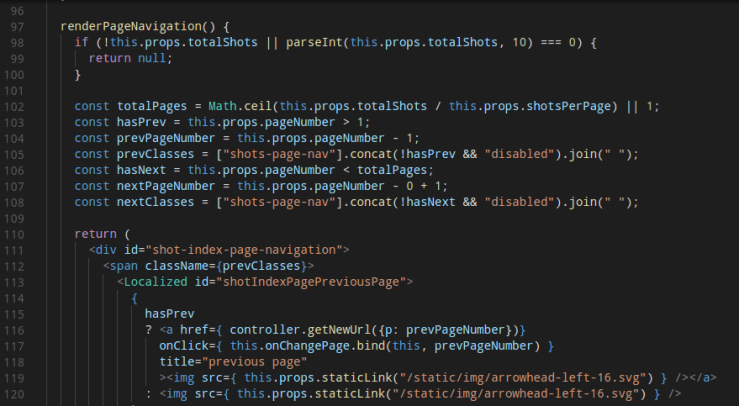
The issue I decided to work on Fix #4180. The fix requires simple Javascript and CSS knowledge. The fix was to “Hide # of pages and pagination UI when user has one page. Show it again when user has more than one page of screenshots”. I was able to find the code quite easily and the code block was straightforward.

Screenshot-2018-3-27 My Shots(1)
This should not be shown


Screenshot from 2018-03-26 23:46:11

Based on the code, I was thinking of checking if totalPages === 1, then return null, else return the HTML code block seen on line 110. I had an issue debugging the new changes and showing the changes. Nothing showed up. When I was debugging on localhost, the changes were seen. With the Screenshot extension, the url is “https://screenshots.firefox.com/shots”. The changes were not showing up on the web browser. I couldn’t solve this issue and wasn’t able to test my changes.

The assignment required us to submit a pull request for the bug fixes. I was able to fix the bug but I couldn’t test the changes. I don’t think it would be wise of me to submit a bug fix that I could not test. I uploaded a link for the changes from my local repo to origin.

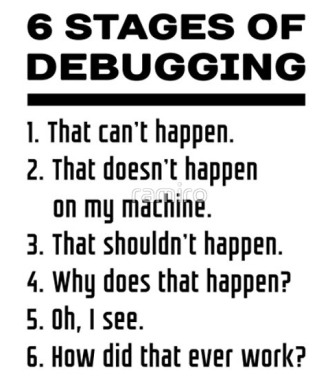
This assignment has proven quite difficult for me for many reasons. Getting a project setup without any instructions is perplexing. I have definitely learned a lot from this assignment. I took Professor Humphrey’s advice on starting the project early, but I still ran into a considerable amount of problems along the way. However, I should have taken his advice on asking others for help. I underestimated the complexity of just debugging a program, which now I realize I could not solve on my own. The code fix was the easy but everything else proved to be difficult for me.


5mbk7oJ

Project Intro – Firefox Screenshots

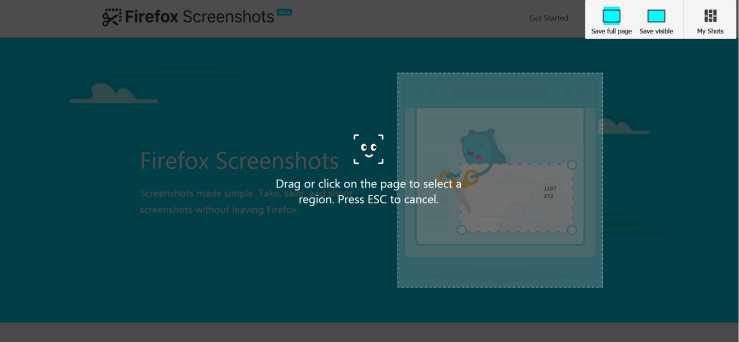
The project that I decided to work on for this release is Firefox Screenshots. Screenshots is a new feature that Mozilla added to their Firefox browser. It is still in beta which means there are quite a few bugs and ‘good first issues’ to solve. I was intrigued by this feature because I’ve never heard of it. Print screening and using the Snipping tool (on Windows) is inconvenient and can be time consuming. Firefox Screenshot allows multiple ways of capturing the page.

  1. Capture parts of the page by clicking on whatever element/container you want to save
  2. Select a region of the page by clicking and dragging the cursor over the area you want
  3. Capture the full page.
  4. Capture only the visible portion of the page.

Once you have selected the image, you can edit, download or share the image.

Screenshot-2018-3-21 Firefox Screenshots

ffss

All of Screenshots’ code and documents can be found on their GitHub repo. This project has about 200 contributors and 75 releases. I found about 29 good first issues that I may be able to work on. Of those 29, there are about 6 defects. I hope to tackle these defects once I get everything up and running. One thing that I noticed is that any localization is managed via Pontoon, not direct pull requests to the repository. I don’t plan on doing any localization but this was something I will keep in mind going forward.

I spent quite some time looking for a project to work on. I found a few interesting ones but I couldn’t solve the bugs. They were either too difficult for me to solve or someone was already working on the bug. I initially tried working on the Brave browser. I am completely unfamiliar with Brave, so the learning curve was steep. I got it up and running but could not figure out how to debug anything. I also tried working on VSCode but I found most of the bugs too difficult for me to solve. I think the majority of the time spent on this release was trying to find a project with solvable bugs. I think I’ve installed around 5 different projects plus their dependencies. I haven’t gotten around to uninstalling them yet, but maybe I will just keep them to remind me of the past frustrations. The next part of the Release can be found here.

ovmasg0cbqm01.jpg

SPO600 – Project Stage 1

For this stage of the project, we had to find and identify a CPU-intensive function or method in an open source software project. This took quite some time because there are so many open source software projects out there. I wasn’t sure were to start, so I started looking at compression and decompression software. I found a few interesting one’s such as Zstandard by Facebook or Brotli by Google. However, since these projects were created by such large and well-known companies, I was hesitant in optimizing their code. I decided to look for a smaller company with less developers on the project.

I found a compression tool called Density. It is a free compression library that focuses on “super fast” compression at the best ratio possible. One of the biggest assets of DENSITY is that its work unit is not a byte like other libraries, but a group of 4 bytes.

I installed the program and ran the initial benchmark tests on my laptop. I’m running a Intel Core i7-3612QM CPU @ 2.10 GHZ, 8 GB RAM on 64-bit OS. Density has three different algorithms available; Chameleon, Cheetah and Lion.


Chameleon ( DENSITY_ALGORITHM_CHAMELEON )

Chameleon is a dictionary lookup based compression algorithm. It is designed for absolute speed and usually reaches a 60% compression ratio on compressible data. Decompression is just as fast. This algorithm is a great choice when main concern is speed.

cha


Cheetah ( DENSITY_ALGORITHM_CHEETAH )

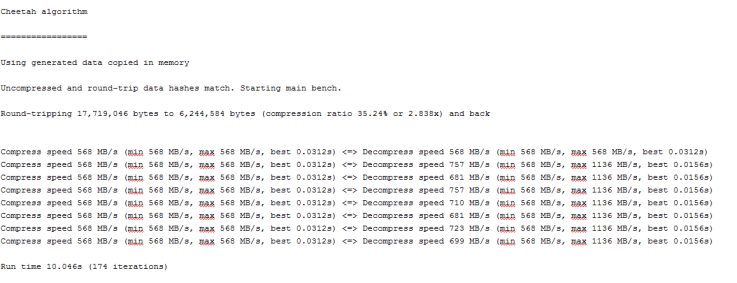
Cheetah was developed with inputs from Piotr Tarsa. It is derived from chameleon and uses swapped double dictionary lookups and predictions. It can be extremely good with highly compressible data (ratio reaching 10% or less). On typical compressible data compression ratio is about 50% or less. It is still extremely fast for both compression and decompression and is a great, efficient all-rounder algorithm.

chet


Lion ( DENSITY_ALGORITHM_LION )

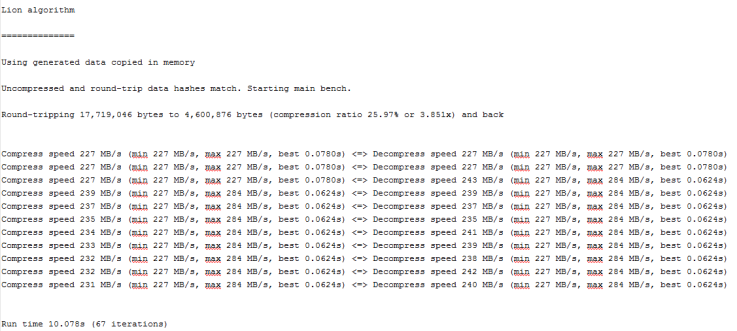
Lion is a multiform compression algorithm derived from cheetah. It goes further in the areas of dynamic adaptation and fine-grained analysis. It uses multiple swapped dictionary lookups and predictions, and forms rank entropy coding. Lion provides the best compression ratio of all three algorithms under any circumstance, and is still very fast.

li

Based on the 3 algorithms above, I think the best one for me to try to optimize is the Chameleon algorithm because it solely focuses on speed.

Lab 5 – Bridge Troll

This week, we had a look at the Bridge Troll game. Using open data, the program imports data about bridges located across Ontario. When you first open the game, you will see your current location. If you come across a bridge, you will see a ‘lock’ icon. I am assuming that once you get to the icon, the icon will change to an ‘unlocked’ icon. The purposes of this lab is to add a feature that will allow the game to switch between light and dark themes depending on the time.

The first task was to find where in the program the themes are imported. After some digging, I found the line of code in the ‘map.js’ file.
var tileUrl = 'https://{s}.tile.thunderforest.com/transport-dark/{z}/{x}/{y}.png

Next, I had to look for a theme provided by Leaflet. The themes they provided weren't that great and it didn't have a specific 'night' theme. I chose the TransportDark theme because it was the closest thing they had. The next task was to install SunCalc which is an open source geolocation app. It can be used to find sun positions as well as sunset and sunrise times. This was useful for implementing the day and night themes because now, the themes can be applied automatically depending on the time. The logic for this was pretty straight forward.

I created a function(nightTheme()) that would return true or false depending if the current time was in a certain range. If the time was greater than the sunset hours or less than the sunrise hour, then it would be true (night time). If not, then it would return false (day time). SunCalc made this task very easy.

os.PNG

mp.PNG
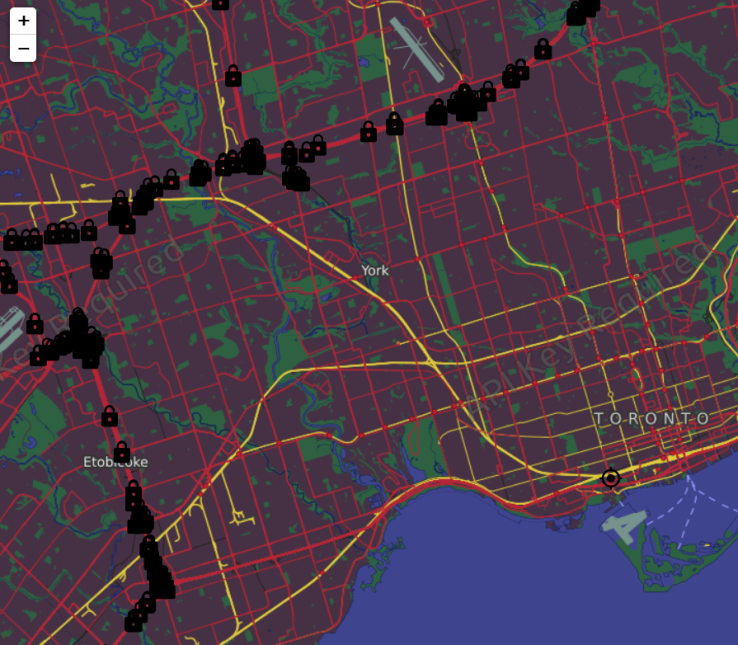
The theme for night time

As you can see from the screenshot above, the icons for the bridges are not user friendly, it is too dark. The next task was to change the color of the icons depending on the themes. I had trouble with this portion of the lab. I wasn't able to figure out how to code it but I came up with two possible solutions.

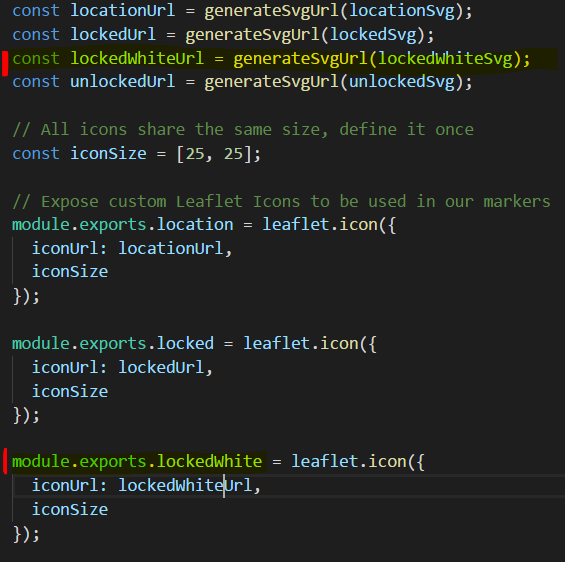
The first solution was to download the white version of the SVG icons. After downloading the white versions, we load the SVGs into the program. Then, depending on what nightTheme() returns, it will place that icon onto the map. The issue I ran into was that I didn't know where to insert the logic to decide which icon to place. I found the piece of code that adds the icon in index.js, but I couldn't change between the two SVGs.

lock.PNG

The other solution was to change the SVG fill color within the code. I had a look at the SVG file and noticed that there was a <svg fill="#000000"..../> line. I wanted to see if I could create a function that could change the fill color. I created an id for the SVG so that I could reference it later on. I tried using document.getElementById("locked").setAttribute("fill", "#FFFFFF"), but it didn't seem to work. This approach would be more efficient than the previous one that I had mentioned. However, I was not able to get the SVG icon to change colours. Hopefully, another student will figure this part out because I am curious to see how they did it :).


Lab 4 – Contributing to Open Standards

This week’s lab, we discussed Open standards and how to contribute to them.

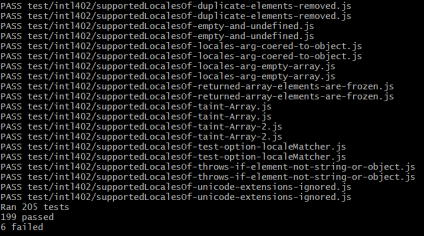
The first thing we had to do was to install the test suite and run the initial tests. I was able to clone the repo and install the program easily. I ran the tests on the command line on Windows 7. The tests were taking quite some time so I decided to read other students blogs just to see if I was on the right track. To my surprise, every blog I read had 199 Passes and few fails. I started panicking thinking that I did something wrong. Luckily, one student mentioned in their blog that you cannot run the tests on Windows command line and to use bash shell instead. I opened up Git Bash and ran the tests again. This time, it took only about 30 seconds to complete. The tests on the command line are still running as I am blogging about this. I am curious to see what the output will be.

test.PNG

The next step is to become familiar with the tests. The tests seem straight forward enough to understand. I’ve never coded in JavaScript before so it was reassuring that the code was intuitive enough for me to understand. The .toUpperCase() tests checks if the .toUpperCase() function works with different combinations of uppercase letters and symbols. Array.reverse() takes the elements in an array and reverses the value at each index. An array [1,2,3,4,5] would be reversed to [5,4,3,2,1].

I’ve added some test cases to check false, Inifinity, NaN, undefined and -1 using S15.4.4.8_A1_T2.js as a reference. I also added a test case to check if the length is preserved using assert.sameValue().

test2.PNG

With this test case, it seems crucial to test as many scenarios as possible because the .reverse() function deals with arrays. Arrays can have various data types and values in each indices. This lab taught me how test cases work in JavaScript. This lab had a lot of firsts for me. This was my first time writing a JavaScipt test, using gist, and analyzing open standard code.

*The tests on Windows command line are still running… after 2 hours.