OSD600 – Final Release

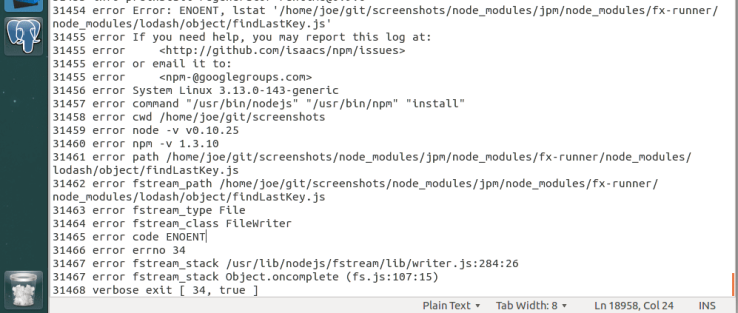
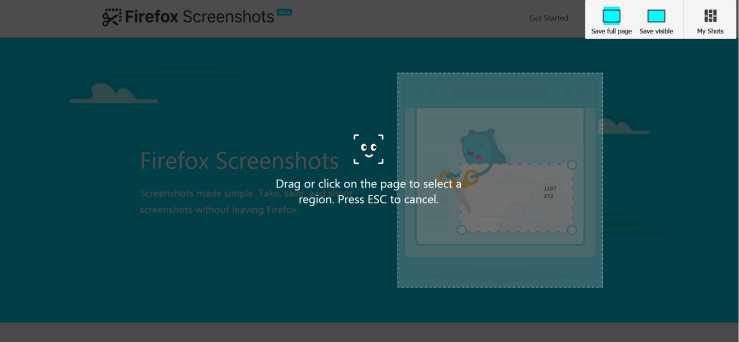
For the final release, I decided to stick with Firefox Screenshots. I was still having issues with debugging the extension, so this time I took a different approach. I looked through the solved/closed issues to see if there was any mention of debugging or something that could possibly help me. I stumbled upon a closed issue that used Firefox Nightly to recreate the issue. Maybe if I tried recreating bugs with solved issues, it will help me  with my debugging issue. I felt like I was getting closer to being able to debug the extension, but again, no luck. With all of  these problems and no help from their documentation, I decided that I should document how to install the extension for Linux.

I remember when I first started on this project, it took me about 4 hours to install PostgreSQL and to get the server up and running. Now that I am familiar with PostgreSQL, it took me about 10 mins to uninstall, purge and reinstall it. The installation isn’t too difficult if you know what you are doing. I uninstalled and completely purged PostgreSQL from my laptop. I had to make sure that there was no trace of it left anywhere on my system. I had to kill the open ports, stop the services and then uninstall the program and all of its dependent packages. I reinstalled the database and ran the program. It worked! Now, I had to uninstall and purge again and start documenting.  I think I did this about 5 times before being confident enough to submit a pull request. This was their response:

Screenshot_2018-04-23 Download , Share and Delete buttons do not loose their highlight after each respective action is can[...]

What was frustrating about all of this is that their README only says “Install PostgreSQL”. There are a bunch of additional steps you need to do before getting the server up and running and to get the extension to run on localhost. If there were instructions initially, this would have saved me a lot of time (and tears). I had hoped that with my contribution, I could have help somebody with the installation and with no troubles. I understand where they are coming from, but they should have at least linked PostgresSQL’s instructions some where on their page.

For my second bug fix, I found a CSS issue that causes buttons to remain active, even after being clicked. 30171034-69584802-93f9-11e7-87a1-93d401518abe.gif

I found this bug quite simple to solve. Now that I am familiar with the code, I located the CSS file that contained the styling for the button. The issue was that the styling for hover and focus were the same. I separated the two attributes and removed the background-color for focus. I kept the border however, so that you can still distinguish if the button is in focus or not. I submitted the pull request with no issues this time and hopefully they accept my code change.

During the last 4 months, I gained first hand experience in the open source world. I was hesitant in the beginning, thinking that this would be to difficult for me. At some point, this was true, but I still tried my best with these assignments. For this last release, I felt like I learned how challenging yet rewarding open source projects can be. This was definitely a learning experience that I can carry forward throughout my career.


Lab 6- Brave Browser Bug

This week’s lab we focused on Brave Browser. For this lab, we were required  to fix a bug in Brave using Test Driven Development. This is the first time I have heard of this term, but I am somewhat familiar with the concept. From my understand of it, we need to create tests that would currently fail, and work backwards from there. From these tests, we can code the fix for the bug.

The first step was to build Brave. I had no issues here. The next steps were to recreate the bug. The bug is about how the browser handles URLs. URLs can sometimes be search terms that are used by the default browser. For example, simply typing “dog” into the URL bar will search for “dog” in the search engine. Brave does this as well. The issue arises when you add a space in between words after the search query. Below are the test cases:

  • "dog" - Works as expected
  • " dog "- Works as expected
  • "dog cat"- Works as expected
  • " dog cat "- Works as expected
  • "https://www.google.ca/search?q=dog"- Works as expected
  • " https://www.google.ca/search?q=dog "- Works as expected
  • "https://www.google.ca/search?q=dog cat" - does not work as expected. Instead places the link inside search box.
  • " https://www.google.ca/search?q=dog cat " - does not work as expected. Instead places the link inside search box.
  • "/home/joe/git/browser-laptop/dog cat.txt" - Does not work as expected. Puts this URL inside search engine.
  • " /home/joe/git/browser-laptop/dog cat.txt " - Does not work as expected. Puts this URL inside search engine.
  • "file:///home/joe/git/browser-laptop/dog cat.txt" - Works as expected, but replaces the space with %20.
  • " file:///home/joe/git/browser-laptop/dog cat.txt " - Work as expected, but replaces the space with %20.

The next step was to create tests. I began with testing URLs with space in between words in the search query.  I created the test cases which failed, as expected. I found the function ‘prependScheme’ which deals with the input URL. I tried fixing this function by adding a replace(/\s/g, “%20”), in each of the if statements. This worked for the case that prepends file:/// before the URL. The issue I was having was that I couldn’t debug Brave through VSCode. I couldn’t tell if my changes were being made to the browser. The only way I could test the code changes was to run the test cases again.

The case I was having difficulties fixing was https://www.google.ca/search?q=dog cat. I couldn’t figure out why the code wasn’t replacing the spaces with %20. I tried creating my own if statement inside prependScheme to replace the spaces. It still wouldn’t work. I decided to look elsewhere; I looked for the code that calls prependScheme. In the function getUrlFromInput, it passes input.trim() to prependScheme. However, it doesn’t replace the spaces with %20. I thought this would be a good place to replace the spaces before passing the URL to prependScheme.w

The change seemed to work, as my tests finally passed. However, I still couldn’t see the changes on Brave.

Firefox Screenshot

dfvbkvoccyn01

After struggling to download, and install Firefox screenshots for well over 2 days, I could not get it to work. Builds would keep failing, the server would not start; nothing is working. The source of my frustration is the fact that their README is useless. They provided no information or details on how to install and set up the project. All it says is “Install Postgres.” Installing Postgres was one of the most frustrating and time consuming things I have probably ever done. They provided no instructions on how to install and setup the server. The next instruction was to “Run the first migration manually”. The link they provided there was also no help. Just a bunch of SQL statements to create tables. I had no idea where to import those tables. After struggling for hours trying to get this server to start, I decided to take a break from it just so that my brain can recover.

I came back to this issue refreshed and ready to work. I had the brilliant idea to stop trying to get this thing to work on Windows but instead, work in Linux. I reinstalled and setup everything on Ubuntu. I still encountered the same issues but this time, I was able to find an Linux installation tutorial on Youtube for Postgresql. I was finally able to get the server running on port 5432 (default port). Awesome, progress. I tried running Firefox extension now that the server is up and running. I kept getting strange errors regarding babel, nodejs, node-sass etc. I reinstalled each of the dependencies one at a time which solved most of the issues. However, the code still failed to build. This was the error I got: Screenshot from 2018-03-26 14:04:14

I had no idea what this meant. Again, I spent hours installing and reinstalling everything. I didn’t know if this was a server issue or build issue. Nothing worked and I was pretty close to giving up on this entirely. That’s when I noticed something in the error log. On line 31459 above, the node version shows 0.10.25. I was dumbfounded. I was using a dinosaur version of Nodejs. Once I updated Node and npm, the application finally build. I opened up Firefox with the URL localhost:10080, and for the first time in my life, I jumped for joy. The funny thing is, I haven’t even touched the code yet. The next battle begins.

I started by making small changes to the home page of Firefox Screenshots. I made the changes, restarted the server and reloaded the page. I didn’t see anything change. This was really frustrating because I have no idea where to begin. I checked to see if I was working in the right directory. I checked if the server was still running. Everything looked good. It turns out that I have to reload the page and bypass the cache. So far so good, I was able to modify the homepage. Screenshot-2018-3-26 Firefox Screenshots.png

The issue I decided to work on Fix #4180. The fix requires simple Javascript and CSS knowledge. The fix was to “Hide # of pages and pagination UI when user has one page. Show it again when user has more than one page of screenshots”. I was able to find the code quite easily and the code block was straightforward.

Screenshot-2018-3-27 My Shots(1)
This should not be shown


Screenshot from 2018-03-26 23:46:11

Based on the code, I was thinking of checking if totalPages === 1, then return null, else return the HTML code block seen on line 110. I had an issue debugging the new changes and showing the changes. Nothing showed up. When I was debugging on localhost, the changes were seen. With the Screenshot extension, the url is “https://screenshots.firefox.com/shots”. The changes were not showing up on the web browser. I couldn’t solve this issue and wasn’t able to test my changes.

The assignment required us to submit a pull request for the bug fixes. I was able to fix the bug but I couldn’t test the changes. I don’t think it would be wise of me to submit a bug fix that I could not test. I uploaded a link for the changes from my local repo to origin.

This assignment has proven quite difficult for me for many reasons. Getting a project setup without any instructions is perplexing. I have definitely learned a lot from this assignment. I took Professor Humphrey’s advice on starting the project early, but I still ran into a considerable amount of problems along the way. However, I should have taken his advice on asking others for help. I underestimated the complexity of just debugging a program, which now I realize I could not solve on my own. The code fix was the easy but everything else proved to be difficult for me.


5mbk7oJ

Project Intro – Firefox Screenshots

The project that I decided to work on for this release is Firefox Screenshots. Screenshots is a new feature that Mozilla added to their Firefox browser. It is still in beta which means there are quite a few bugs and ‘good first issues’ to solve. I was intrigued by this feature because I’ve never heard of it. Print screening and using the Snipping tool (on Windows) is inconvenient and can be time consuming. Firefox Screenshot allows multiple ways of capturing the page.

  1. Capture parts of the page by clicking on whatever element/container you want to save
  2. Select a region of the page by clicking and dragging the cursor over the area you want
  3. Capture the full page.
  4. Capture only the visible portion of the page.

Once you have selected the image, you can edit, download or share the image.

Screenshot-2018-3-21 Firefox Screenshots

ffss

All of Screenshots’ code and documents can be found on their GitHub repo. This project has about 200 contributors and 75 releases. I found about 29 good first issues that I may be able to work on. Of those 29, there are about 6 defects. I hope to tackle these defects once I get everything up and running. One thing that I noticed is that any localization is managed via Pontoon, not direct pull requests to the repository. I don’t plan on doing any localization but this was something I will keep in mind going forward.

I spent quite some time looking for a project to work on. I found a few interesting ones but I couldn’t solve the bugs. They were either too difficult for me to solve or someone was already working on the bug. I initially tried working on the Brave browser. I am completely unfamiliar with Brave, so the learning curve was steep. I got it up and running but could not figure out how to debug anything. I also tried working on VSCode but I found most of the bugs too difficult for me to solve. I think the majority of the time spent on this release was trying to find a project with solvable bugs. I think I’ve installed around 5 different projects plus their dependencies. I haven’t gotten around to uninstalling them yet, but maybe I will just keep them to remind me of the past frustrations. The next part of the Release can be found here.

ovmasg0cbqm01.jpg

Lab 4 – Contributing to Open Standards

This week’s lab, we discussed Open standards and how to contribute to them.

The first thing we had to do was to install the test suite and run the initial tests. I was able to clone the repo and install the program easily. I ran the tests on the command line on Windows 7. The tests were taking quite some time so I decided to read other students blogs just to see if I was on the right track. To my surprise, every blog I read had 199 Passes and few fails. I started panicking thinking that I did something wrong. Luckily, one student mentioned in their blog that you cannot run the tests on Windows command line and to use bash shell instead. I opened up Git Bash and ran the tests again. This time, it took only about 30 seconds to complete. The tests on the command line are still running as I am blogging about this. I am curious to see what the output will be.

test.PNG

The next step is to become familiar with the tests. The tests seem straight forward enough to understand. I’ve never coded in JavaScript before so it was reassuring that the code was intuitive enough for me to understand. The .toUpperCase() tests checks if the .toUpperCase() function works with different combinations of uppercase letters and symbols. Array.reverse() takes the elements in an array and reverses the value at each index. An array [1,2,3,4,5] would be reversed to [5,4,3,2,1].

I’ve added some test cases to check false, Inifinity, NaN, undefined and -1 using S15.4.4.8_A1_T2.js as a reference. I also added a test case to check if the length is preserved using assert.sameValue().

test2.PNG

With this test case, it seems crucial to test as many scenarios as possible because the .reverse() function deals with arrays. Arrays can have various data types and values in each indices. This lab taught me how test cases work in JavaScript. This lab had a lot of firsts for me. This was my first time writing a JavaScipt test, using gist, and analyzing open standard code.

*The tests on Windows command line are still running… after 2 hours.

Lab 3 – VSCode Bug

Given the list of bugs I decided to work on “Fix #43302 Opening .bat file in VSCode via context menu in windows explorer tries to execute it”. The first thing I tried to do was to recreate the bug. In the steps to reproduce, the user mentions that you need to right-click the .bat file and click on “Open with Code”. For some reason, this didn’t show up for me. File explorer did not give me an option to “Open with”. I googled “Visual Studio Code Open with” and came across a website that shows how to get this to show up. Apparently, it is an option when you first setup VSCode.Capture.PNG

The only other option was to edit the registry on my laptop, which I did not feel comfortable doing, so I reinstalled VsCode with those options checked. Once it was installed, I right-clicked the file and “Open with code” shows up! I click on it and the .bat file opens in VSCode no problem. File explorer didn’t run the .bat file. I went back to the bug to see if I had missed a step. I noticed that the user listed the extensions he has installed on VSCode. I decided to install the same extensions to see if that might create the bug. After installing the 6 extensions, I tried again. Still nothing. The issue might be caused by the user using an older version of VSCode. He was on 1.19.3, while I’m using 1.20.1. Since I couldn’t recreate the bug, so I tried another bug.

The next bug I tried was “Fix #42720 Color picker: no longer appears in settings editor”. I went in VSCode’s setting to try to recreate the bug. I hover the cursor of the hex color value and the color pick shows up.  Again, I could not recreate the bug. I tried both Dev and Standard versions of VSCode. My partner wasn’t able to recreate the bugs either. We tried one more bug.

The last bug we tried was “Fix #16834 Search in folder with special characters `{}` yields no results.” The user is using Mac OS for this bug, but I decided to try to recreate it in Windows. I created a folder, {hello} with test.txt inside of it. I also create a folder without the {} just to see if the search function works to begin with. I followed the steps and couldn’t seem to find the file within {hello}. I finally found a bug! Yay? I then tried to search for the folder without the {}. It was able to find the directory. The next step is to locate where the code for the search feature is. After about an hour of looking, I couldn’t seem to find where the code was. (Edit 02/22: We went through this bug in class and found the code). I may have overlooked a function somewhere in the code.

In the end, finding and trying to recreate bugs is very tedious but rewarding. It really feels like you are doing detective work trying to solve a crime by working backwards. I definitely enjoy finding and recreating bugs. However, fixing them is another story.

Lab 2 – Visual Studio Code

This was my first time hearing about and using Visual Studio Code. The initial setup was a bit tricky because I haven’t had much practice installing applications through command line. I had to install all of the prerequisites such as Node.JS, Yarn and Python. I ran into issues where a command doesn’t exist or it is missing another application. Once I was able to run “yarn run watch” it started working!

My first impression of VSCode was that the layout and themes were nice. I generally prefer a darker theme to work in so I didn’t need to change that. I also didn’t change any of the settings because I haven’t used VSCode before, so I’m not even sure what I would want to change. I think once I use VSCode more, I’ll eventually change some of the keybindings.

The extensions I installed were the ones that dealt with other languages such as C++, C#, Java. Each of these extensions allows language support. I chose them because these are the languages that I know. It would be beneficial to be able to code those languages on VSCode.

I found the live debugging quite interesting. The option to toggle developer tools was easy to use. I have a little bit of experience playing around with the Inspect tool on FireFox and Chrome, so I was familiar with the one on VSCode. It was interesting to see how you can debugging right in VSCode. It makes it easy to follow the code and find where the source code is stored.

The web technologies that VSCode are all new to me. with the exception of Node.Js, this is my first time being exposed to them. After doing a bit of research on each of the different technologies, I have a better understanding of how each of them work.

TypeScript: a super set of JavaScript. Adds optional static typing.

Electron: Allows for development of desktop GUI applications to use components meant for web applications. Examples are Discord and Spotify.

Node.Js: Executes JavaScript code server-side. JavaScript was used mainly for client-side scripting. Node.js runs scripts to produce dynamic web pages before the page is sent to the browser.

ESlint: Open source JavaScript linting utility.

TSlint: Open soutce TypeScript linter.

gulp: JavaScript tool kit used as a build system for front end development. It is used for automation of repetitive and time-consuming tasks.

mocha: JavaScript test framework.

sinon: a standalone test spies and test framework for JavaScript. Allows spies, stubs and mocks.

yarn: a quick, secure and reliable packaging manager.

Release 0.1

I want to preface this blog post by saying that I have very little experience in creating RESTful API’s in Java. There was a lot of “firsts” for me on this project.

My Java API uses Google’s libphonenumber API to parse a phone number. My program uses Eclipse Neon 3, Maven build tool with Jersey, TomCat Java Servlet, Junit and Mockito testing framework. With the exception of Eclipse, it was my first time using the mention tools.

It took a lot of time researching which tools to use and learning how they work. I would say the majority of my time was spent looking for reading on the tools and watching YouTube tutorials on how to setup the environment. From what I’ve researched, this is my understanding of each tool:

Maven is a software project management tool. It can manage a prokect’s build, reporting and documentation from a central piece of information. Maven projects a file called “pom.xml”. This file contains the projects dependencies, group id, artifact id, version number and how to package the project.

Jersey is a RESTful Web Services framework. It is a JAX-RS(Java REST Web Service) reference implementation that provides features and utilities to simplify RESTful service and client development.

TomCat is an open-source Java Servlet Container.

Junit is a unit testing framework for Java.

Mockito is an open source testing framework. The framework allows the creation of mock objects.

I found this whole release to be challenging. I was quite discouraged to see that the majority of the class used JavaScript for this project and I was one of the few that used Java. The process looked simpler using Node.js and the environment looked easier to set up. The reason I used Java was because I’ve never learned Node.js. I felt that this was a disadvantage but pursued this challenge regardless.

Setting up the environment with the correct dependencies was the most challenging and time consuming. Once I set up my environment, I had to learn how to create a RESTful API in Java. This took quite some time for me to learn as well. The method of creating a REST API will slightly vary depending on which tool you used. It was difficult finding tutorials that used the same tools that I was using. The next challenge was fixing my errors. It became quite frustrating because one error would lead to another; every time I would fix an error, it would cause another error. Most of the errors I encountered was caused by the environment setup. At one point, I imported entire libraries and dependencies in order to get my code working. Once my code started to work, I had to create test cases.

I’ve never created test cases before and was unaware of the frameworks I needed. Again, this took quite some time to learn and setup. I don’t think my test cases are working properly and are still works in progress.

For Part B, I felt I was slightly limited in which bugs I wanted to fix. Only 3 other students wrote their code in Java. I also ran into trouble running their programs on my laptop. I think this was due to the way I set up Eclipse on my laptop. Also, some of the README files were not specific enough, so I couldn’t really figure out their instructions. The bug I decided to work on was an enhancement. I wanted to add code to parse PDFs. Again, this took some researching and finding sample codes. After completing the code, I felt accomplished and surprised that I actually solved the issue. I prefer to be a contributor over a maintainer because I like fixing bugs. I don’t consider myself to be the strong programmer, so being a contributor and working on existing code is something I am more comfortable with.

Overall, this was a very challenging project but I learned a lot from it. Although I was discouraged at the beginning, I felt good about completing the project on my own.


Lab 1 – PeerTube

PeerTube is a Open Source video streaming platform using P2P (BitTorrent) directly in the web browser with WebTorrent. It is fairly new and has not been completed yet. It is sponsored by Framatube. Currently there are 57 issues and 21 contributors. The project is written mostly in TypeScript.

The interesting thing about PeerTube is that the front-end looks very similar to YouTube, but the back-end is very different. YouTube and other video streaming website are on a centralized network. This means that everything is stored in a “central” location (servers). Decentralization means that there is no center point of where data is coming and going. Peer-to-peer makes this possible by allowing users to send and receive data to and from one another. Decentralization is a hot topic right now when it comes to security and privacy.

With PeerTube, users can request to watch a video to the server, which will then pass a torrent URI to the user. Any server (peer) that is seeding the video will send the video back to the requester for them to watch. This allows videos to be watched smoothly and avoids down times caused by overloaded servers. Below is a diagram that illustrates this.

68747470733a2f2f6c7574696d2e6370792e72652f4e765241637636552e706e67

The goal for PeerTube is to “democratize video hosting by creating a network of hosts, whose video views are shared live between users”. I believe that if successful, PeerTube (or another decentralized streaming service) can eventually overtake YouTube as a video streaming site. I am curious to see how they overcome major obstacles such as copyright and advertisements. Their beta release date is March 2018.